
1989-Mitsu-Factory Manual · Задняя подвеска · страница 10 из 10 · Открыть оригинал PDF ↗
STABILIZER BAR REMOVAL AND INSTALLATION
NmA-
30-40 Nm
/’
t2-door vehicles>
<4-door vehicles>
bolt 7. Rubber bushing
bolts 8. Collar
a* 9. Stabilizer
NOTE
(1) Reverse the remove1 procedures to reinstall.
bolt and nut (2) ++ : Refer to “Servjce Points of Removal”.
(3) 1’4 : Refer to “Service Pornts of Installation”
(4) : Tighten when the vehrcle is unloaded.
(5) m : Non-reusable parts
Removal steps
1. Parking brake cable attaching bolt
2. Shock absorber mounting bolts
(Lower side)
3. Bracket C
4. Bushing B
I)+ 5. Stabilizer bar mounting bolt and nut
: Refer to “Service Pornts of Installation”
6. Joint cup
SERVICE POINTS OF REMOVAL
NI7mU
9. REMOVAL OF STABILIZER BAR
Slowly lower the jack and remove the stabilizer bar to the
vehicle right side.
Caution
When lowering the jack, take care not to damage the
rear brake tube between the main brake tube and the
rear axle housing.
Проверка
NVIBAB
a Check the stabilizer bar for bend and deformation.
e Check the rubber parts for cracks or deterioration.
NI7lCP5
SERVICE POINTS OF INSTALLATION
5. STABIUZER BAR MOUNTING BOLT AND NUT
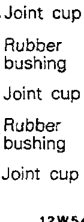
(1) To install the stabilizer bar, assemble the joint cups
and rubber bushings by the order and the certain
direction as shown in the figure.
(2) Install the nut on the stabilizer bar mounting bolt to the
specified dimensions.
Standardvalue : 15-17 mm (.59-.67 in.)
Оригинальная страница руководства
