
1991-Montero-Service-Manual · drive axle front · страница 5 из 10 · Открыть оригинал PDF ↗
of shaft to prevent boot damage during removal.
3) Remove DOJ boot. Note size of boot. Remove dust cover from
shaft. Straighten BJ boot protector and remove protector band. Move
boot protector toward BJ side of shaft and remove. Remove BJ boot.
CAUTION: Drive axle and BJ are serviced as a unit. DO NOT
disassemble BJ and drive axle.
REASSEMBLY
1) Coat shaft with light coat of grease. Wrap splines with
tape. Install BJ boot, bands and DOJ boot on shaft. Ensure correct
size boot is installed in proper location.
2) Boot bands must be installed so lever is pulled toward
rear of vehicle when band is tightened. Pack proper amount of grease
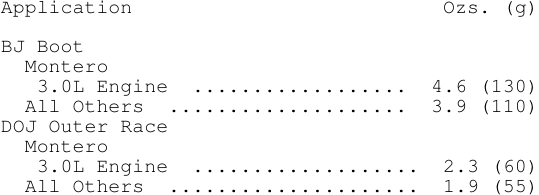
in BJ and BJ boot. See GREASE APPLICATION table.
3) Place DOJ cage on shaft with smaller diameter installed
first. Install circlip, DOJ inner race, and snap ring on shaft. Apply
grease to DOJ inner race and cage. Install balls into cage.
4) Apply proper amount of grease to outer DOJ race. Install
shaft into DOJ outer race. Apply proper amount of grease to DOJ outer
race and install circlip. See GREASE APPLICATION table.
5) Place DOJ boot over DOJ outer race. Install boot bands so
lever is pulled toward rear of vehicle when band is tightened. Adjust
DOJ boot bands to have proper distance between centerline of boot
bands. See BOOT BAND SPECIFICATIONS table. This distance is necessary
to control air in DOJ boot. Tighten boot bands.
6) Install boot protector and band. Install dust cover on
shaft. Use a pipe with O.D. of 2.68" (68.0 mm), wall thickness of .09"
(2.3 mm) and with overall length of 6.70" (170.1 mm) to install dust
cover.
GREASE APPLICATION
| Application Ozs. (g) |
|---|
| BJ Boot |
| Montero |
| 3.0L Engine .................. 4.6 (130) |
| All Others .................... 3.9 (110) |
| DOJ Outer Race |
| Montero |
| 3.0L Engine ................... 2.3 (60) |
| All Others ..................... 1.9 (55) |
Таблица в оригинале
| BOOT BAND SPECIFICATIONS |
|---|
| Application In. (mm) |
| All Models .......... 3.03-3.27 (76.9-83.0) |
Таблица в оригинале

DIFFERENTIAL DISASSEMBLY
1) Remove differential carrier from vehicle. See DIFFERENTIAL
CARRIER R & I in this article. Remove cover. Mark bearing caps for
reassembly reference. Remove bearing caps. Remove differential case
assembly from carrier.
CAUTION: Ensure adjusting spacers, bearing caps, gears and side
bearings are marked for reassembly reference. Components
Оригинальная страница руководства
